
Happy Sewing Machine Day (yes, this is a thing)! On this day 225 years ago, Thomas Saint invented an ingenious contraption that allowed people to easily create their very own belongings and apparel for the first time.
If you weren’t aware of this day of sewing celebration, you probably also aren’t aware of these incredibly simple, fun ways to spruce up and personalize your own home either.
So show your sewing machine some love today and try out these five fun, easy, Do-It-Yourself (DIY) projects to brighten up each and every room of your living space!
1.) Hanging Dish Towel / Pot Holder Combo For Your Kitchen
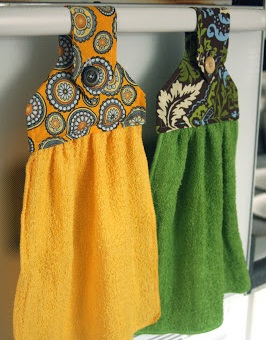 If you’re anything like me, you have a chronic shortage of kitchen towels – not because you don’t own any, but because they’re constantly going missing no matter where you put them. For people like us, these hanging dish towel/pot holder combos are lifesavers! They’re so simple to make and, thanks to their secure hanging abilities, they’re not going anywhere any time soon!
What you need: A pot holder (square or oval is fine) with a loop, a kitchen towel, a button, your sewing machine, and some thread.
- Step 1: Start by finding the center of the dish towel and sew in a gathering stitch. To do this, simply sew two straight lines close to each other from long edge to long edge with a large stitch length. Stop your machine before going completely through the edge of the towel and leave a few thread tails off each side. Take these thread tails and pull until the towel bunches up to the same width as the pot holder.
- Step 2: Flip the pot holder over so its “right” side is facing down and mark two lines across the center with a pencil – make sure the loop is not along one of the marked edges.
- Step 3: Lay the dish towel out “right” side up and place the potholder “right” side down on top of the towel so the marked lines match up with the gathering stitches. Pin these in place and sew a standard length stitch along the marked lines of the pot holder to connect the towel.
- Step 4: Fold the pot holder over to its “wrong” sides are together and there’s your dish towel/pot holder! To make it hang, sew a button into the pot holder so you can easily secure the loop over it!
2.) Chair Socks For Your Dining Room
If you have hardwood floors or flooring that scratches easily, you will definitely want to try out this charming and functional project idea. Chair socks are a great way to add some character and color to your dining room while also saving you from the stress of accidentally scratching up your floors.
What you need: A pair of patterned calf or knee socks (you can also recycle old socks that might have holes in the toes or heels!), a measuring tape, your sewing machine, and scissors.
- Step 1: Find the width of your chair sock by measuring the circumference of the chair leg you plan to cover and subtracting half an inch. Then, measure how high you would like your chair sock to go and cut your sock to two times that length (for instance, if you want it to go 3 inches up the chair leg, cut the sock to 6 inches) leaving out the foot. Finally, cut straight down one side to open the sock up.
- Step 2: Measure the width of your sock material and divide that by the diameter of the chair leg. This will tell you how many chair socks you can get out of your material. Cut the sock into these sections.
- Step 3: Fold each section in half with the “right” sides together. Sew a quarter inch seam along three edges, leaving one short edge open. Then fold your sock right-side-out and slide it over your chair leg! It looks great, and it’s so simple and easy!
That about covers scratches, but if you’re looking for an easy DIY way to clean those hardwood floors, check out 4 Good Uses for Ice Tea.
3.) Personalized Shower Curtain For Your Bathroom
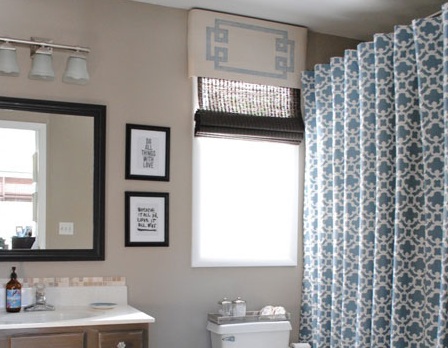 Shower curtains are important for keeping your bathroom floors dry and avoiding water damage, but nice decorative curtains can be so expensive to buy! Luckily, you can create and design your own shower curtains to perfectly match your bathroom with a few cheap, easy tricks with your sewing machine. There are a bunch of different styles and designs you can play around with – this is what I tried on my own curtains!
What you need: A plain shower curtain or painter’s drop cloth, ribbon/fringe/fabric for decoration (I’d recommend grabbing all 3 for a fantastic style!), your sewing machine, and scissors.
- Step 1: Make sure your curtain or painter’s cloth fits you shower’s measurements. If your curtain or drop doesn’t have hanging holes yet, fold over the top two inches and sew the two sides together along its length. Create button holes approximately six inches apart from one another.
- Step 2: Place your fringe or decorative ribbon over the seam you just created to cover it up and sew into the curtain for a finished look.
- Step 3: Take your decorative fabric and cut it to the length of the curtain plus two inches (one for each side). Then cut the height of your fabric by measuring how high up you want it to go and adding one inch for the bottom. Before attaching the fabric to the curtain, sew a strip of the fringe or ribbon to the top of the fabric to cover up the seam that will eventually be there.
- Step 4: Sew the fabric onto the curtain, making sure to fold over the extra fabric on those three sides. You can apply trimming ribbons or fringe to the bottom for extra decoration!
4.) Amazingly Simple Pillow Covers For Your Living Room
Some people (cough-my mother-cough) can’t seem to stay satisfied with decorations for long and are constantly searching for new styles and color schemes. However, this can get incredibly expensive if you keep buying new decorations each time you get a new stylist’s whim. One of the easiest ways to satisfy these urges while not angering you bank account at the same time is to make your own pillow cases! You can buy dozens of different fabrics and patters and simply switch things around or create whole new styles whenever you get bored of the old design!
What you need: Fun decorative fabrics, a pillow or a pillow form, your sewing machine, and scissors.
- Step 1: Measure out your fabric to the width of the pillow plus one inch and the height of the pillow plus six inches. Then hem the two short edges by folding them over by half an inch and sewing it down.
- Step 2: Lay the fabric “right” side up with the pillow over the middle and fold the hemmed edges towards the center. Overlap the edges to the fabric hugs the pillow tightly. Line the fabric edges up so everything is straight and pin one dies together. Carefully slip the pillow or pillow form out.
- Step 3: Pin along the long edges of the fabric to keep them together as you sew from end to end with a half inch seam (you should be sewing perpendicular to the hemmed edges you just created).
- Step 4: Turn your pillow case right-side-out, poke out the corners, and voila!
5.) A Memorable T-Shirt Quilt For Your Bedroom
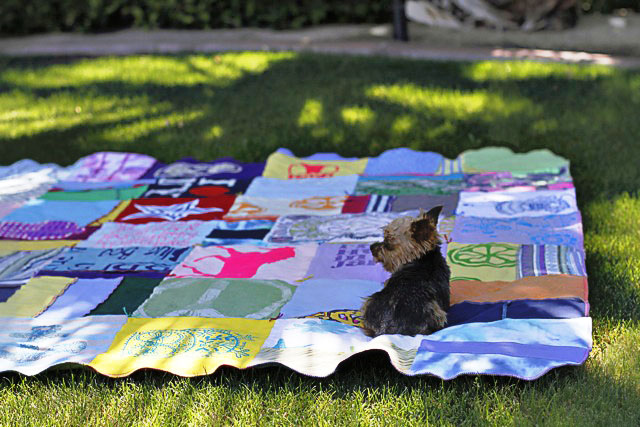 This is a fantastic way to not only add a personal touch to your bedroom but to also recycle all those old t-shirts you’ve accumulated over the years! T-Shirt quilts take a lot of time and patience to create, but once you’re done you have a one-of-a-kind sentimental feature that is also surprisingly warm and cozy.
What you need: Fleece fabric (you want approximately one yard for every five shirts you use), Old T-Shirts, lots of thread, your sewing machine, and scissors.
- Step 1: First, you need to decide how large you want to make your blanket and many shirts you want to use. Typically, a twin size blanket should feature 24 shirts (4 x 6), while a full size needs 35 (5 x 7), a queen need 42 (6 x 7), and a king needs 49 (7 x 7). If you don’t have that many shirts laying around, don’t worry! You can maximize on material by using both the front and the back of each shirt.
- Step 2: Cut out 16 x 16 inch squares from each shirt. Make sure that if there’s a design you keep it centered.
- Step 3: Organize the shirt squares into the design you like. If you’re still short on shirts, you can always mix it up by adding different squares of fabric throughout the design as well. Once you have a setup you like, slightly overlap and pin the shirts together one row at a time and then sew them together. Once you finish creating all the rows you can begin connecting them together completely.
- Step 4: Cut you fleece so it matches the size of your shirt layer. Pin the shirt layer “right” side down to the fleece (if you fleece also has a pattern, make sure the “right” side is up, like you’re making a “right” side sandwich). Sew three sides together, keeping one open so you can flip the blanket right-side-out. Once flipped around, sew up the remaining side.
- Step 5: Cut you fleece so it matches the size of your shirt layer. Pin the shirt layer “right” side down to the fleece (if you fleece also has a pattern, make sure the “right” side is up, like you’re making a “right” side sandwich). Sew three sides together, keeping one open so you can flip the blanket right-side-out. Once flipped around, sew up the remaining side.
These are just five simple sewing projects I’ve tried out myself, but the options and possibilities are endless! There are so many easy ways to bring in your own personality and give your home a fresh start this season, so don’t underestimate the creative DIY powers of your home sewing machine. For more details and suggestions for DIY projects from 911 Restoration, visit the “do-it-yourself” section of our homepage now!